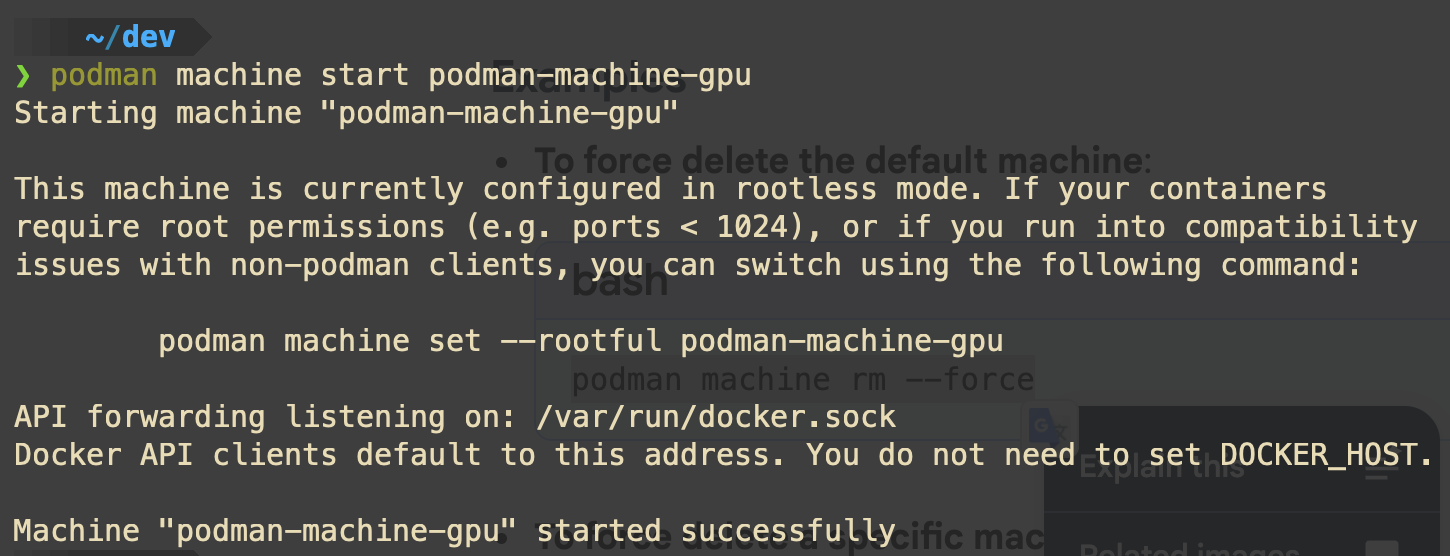
Ok, this should be a quick one, but it got me at least twice so far, so it’s time to note it down. Recently I updated both Podman Desktop (1.24.2) as well as Podman machine (after being 16+ months old). However, there was no updates to the Podman engine (currently at 5.7.1).
I am using Docker CLI on macOS for all interaction with local images and containers, as Podman ensures API forwarding listening on /var/run/docker.sock. Docker API clients (such is Docker CLI) default to this address. In most instances, you don’t need to set DOCKER_HOST.
Needless to say, just yesterday I also updated Docker CLI (29.1.5).
Until all of these updates, any Docker CLI command (such as docker images or docker image ls) was working without issues. However, after the updates, I started getting this error:
1
2
3
❯ docker images

API version 1.41 is not supported by this client: the minimum supported API version is 1.44
I was able to find a hint about solution, although in different context, thanks to this SO question. Solution suggests that by placing {"min-api-version": "1.44"} inside ~/.config/docker/daemon.json or ~/.docker/daemon.json should make this issue go away. However, I had doubts that in my scenario that would help, because I am not using Docker engine (no Docker Desktop) and I don’t think that daemon.json configs are acknowledged by Podman.
Before going further into solutions, I really wanted to understand what is going on. Quick look at output of docker version and things started to make sense.
Client: Docker Engine - Community Version: 29.1.5 <----- Version of Docker CLI (also confirmed via 'brew info docker') API version: 1.52 <----- API version that Docker CLI is configured for Go version: go1.25.6 Git commit: 0e6fee6c52 Built: Tue Dec 16 15:33:03 2025 OS/Arch: darwin/arm64 Context: default
Server: linux/arm64/fedora-43 Podman Engine: Version: 5.7.1 APIVersion: 5.7.1 Arch: arm64 BuildTime: 2025-12-08T16:00:00-08:00 Experimental: false GitCommit: f845d14e941889ba4c071f35233d09b29d363c75 GoVersion: go1.25.4 X:nodwarf5 KernelVersion: 6.17.7-300.fc43.aarch64 MinAPIVersion: 4.0.0 Os: linux Conmon: Version: conmon version 2.1.13, commit: Package: conmon-2.1.13-2.fc43.aarch64 OCI Runtime (crun): Version: crun version 1.24 commit: 54693209039e5e04cbe3c8b1cd5fe2301219f0a1 rundir: /run/user/501/crun spec: 1.0.0 +SYSTEMD +SELINUX +APPARMOR +CAP +SECCOMP +EBPF +CRIU +LIBKRUN +WASM:wasmedge +YAJL Package: crun-1.24-1.fc43.aarch64 Engine: Version: 5.7.1 <----- Version of Podman engine (also confirmed via 'brew info podman') API version: 1.41 (minimum version 1.24) <----- Version of Docker Engine API that Podman engine is working with Go version: Git commit: Built: OS/Arch: linux/arm64 Experimental:
So what are we dealing with here?
Docker CLI v29.1.5 (released on Jan 16, 2026) is configured with current maximum Docker Engine API version, which is 1.52
When this was released, they bumped the minimal supported Docker Engine API version to 1.44 (see this for additional evidence).
Podman Engine v5.7.1 (released on Dec 8th, 2025) is still configured for compatibility with Docker Engine API version 1.41, but it will work with min Docker Engine API version 1.24. I was also able to confirm this in Podman’s podman/version/version.go. Alternative way to confirm this is with the command below:
Basically, this new version of Docker CLI is capable of working with API versions [1.52, 1.44]. Podman Engine is expecting [1.41, 1.24]. And you can see that Podman team is already working on fixing this, in commit c9e2028.
For the solution, I simply configured my ~/.zshrc to set DOCKER_API_VERSION to 1.44.
The DOCKER_API_VERSION environment variable is used to force the Docker client to use a specific version of the API when communicating with the Docker daemon (in my case Podman Engine). By default, the Docker client and SDKs use API version negotiation to automatically select a version supported by both the client and the Docker Engine. However, setting DOCKER_API_VERSION disables this negotiation and locks the client to the specified version. Aside from possibility to be used for feature controls, the primary use of this env var is to resolve “client and server don’t have the same version” errors, which can occur if the client is newer than the daemon. If the client is newer than the daemon, the client can request API endpoints that the daemon doesn’t know about.
After this, everything started working again.
1 2 3 4
❯ docker images i Info → U In Use IMAGE ID DISK USAGE CONTENT SIZE EXTRA quay.io/podman/hello:latest 83fc7ce1224f 580kB 0B U
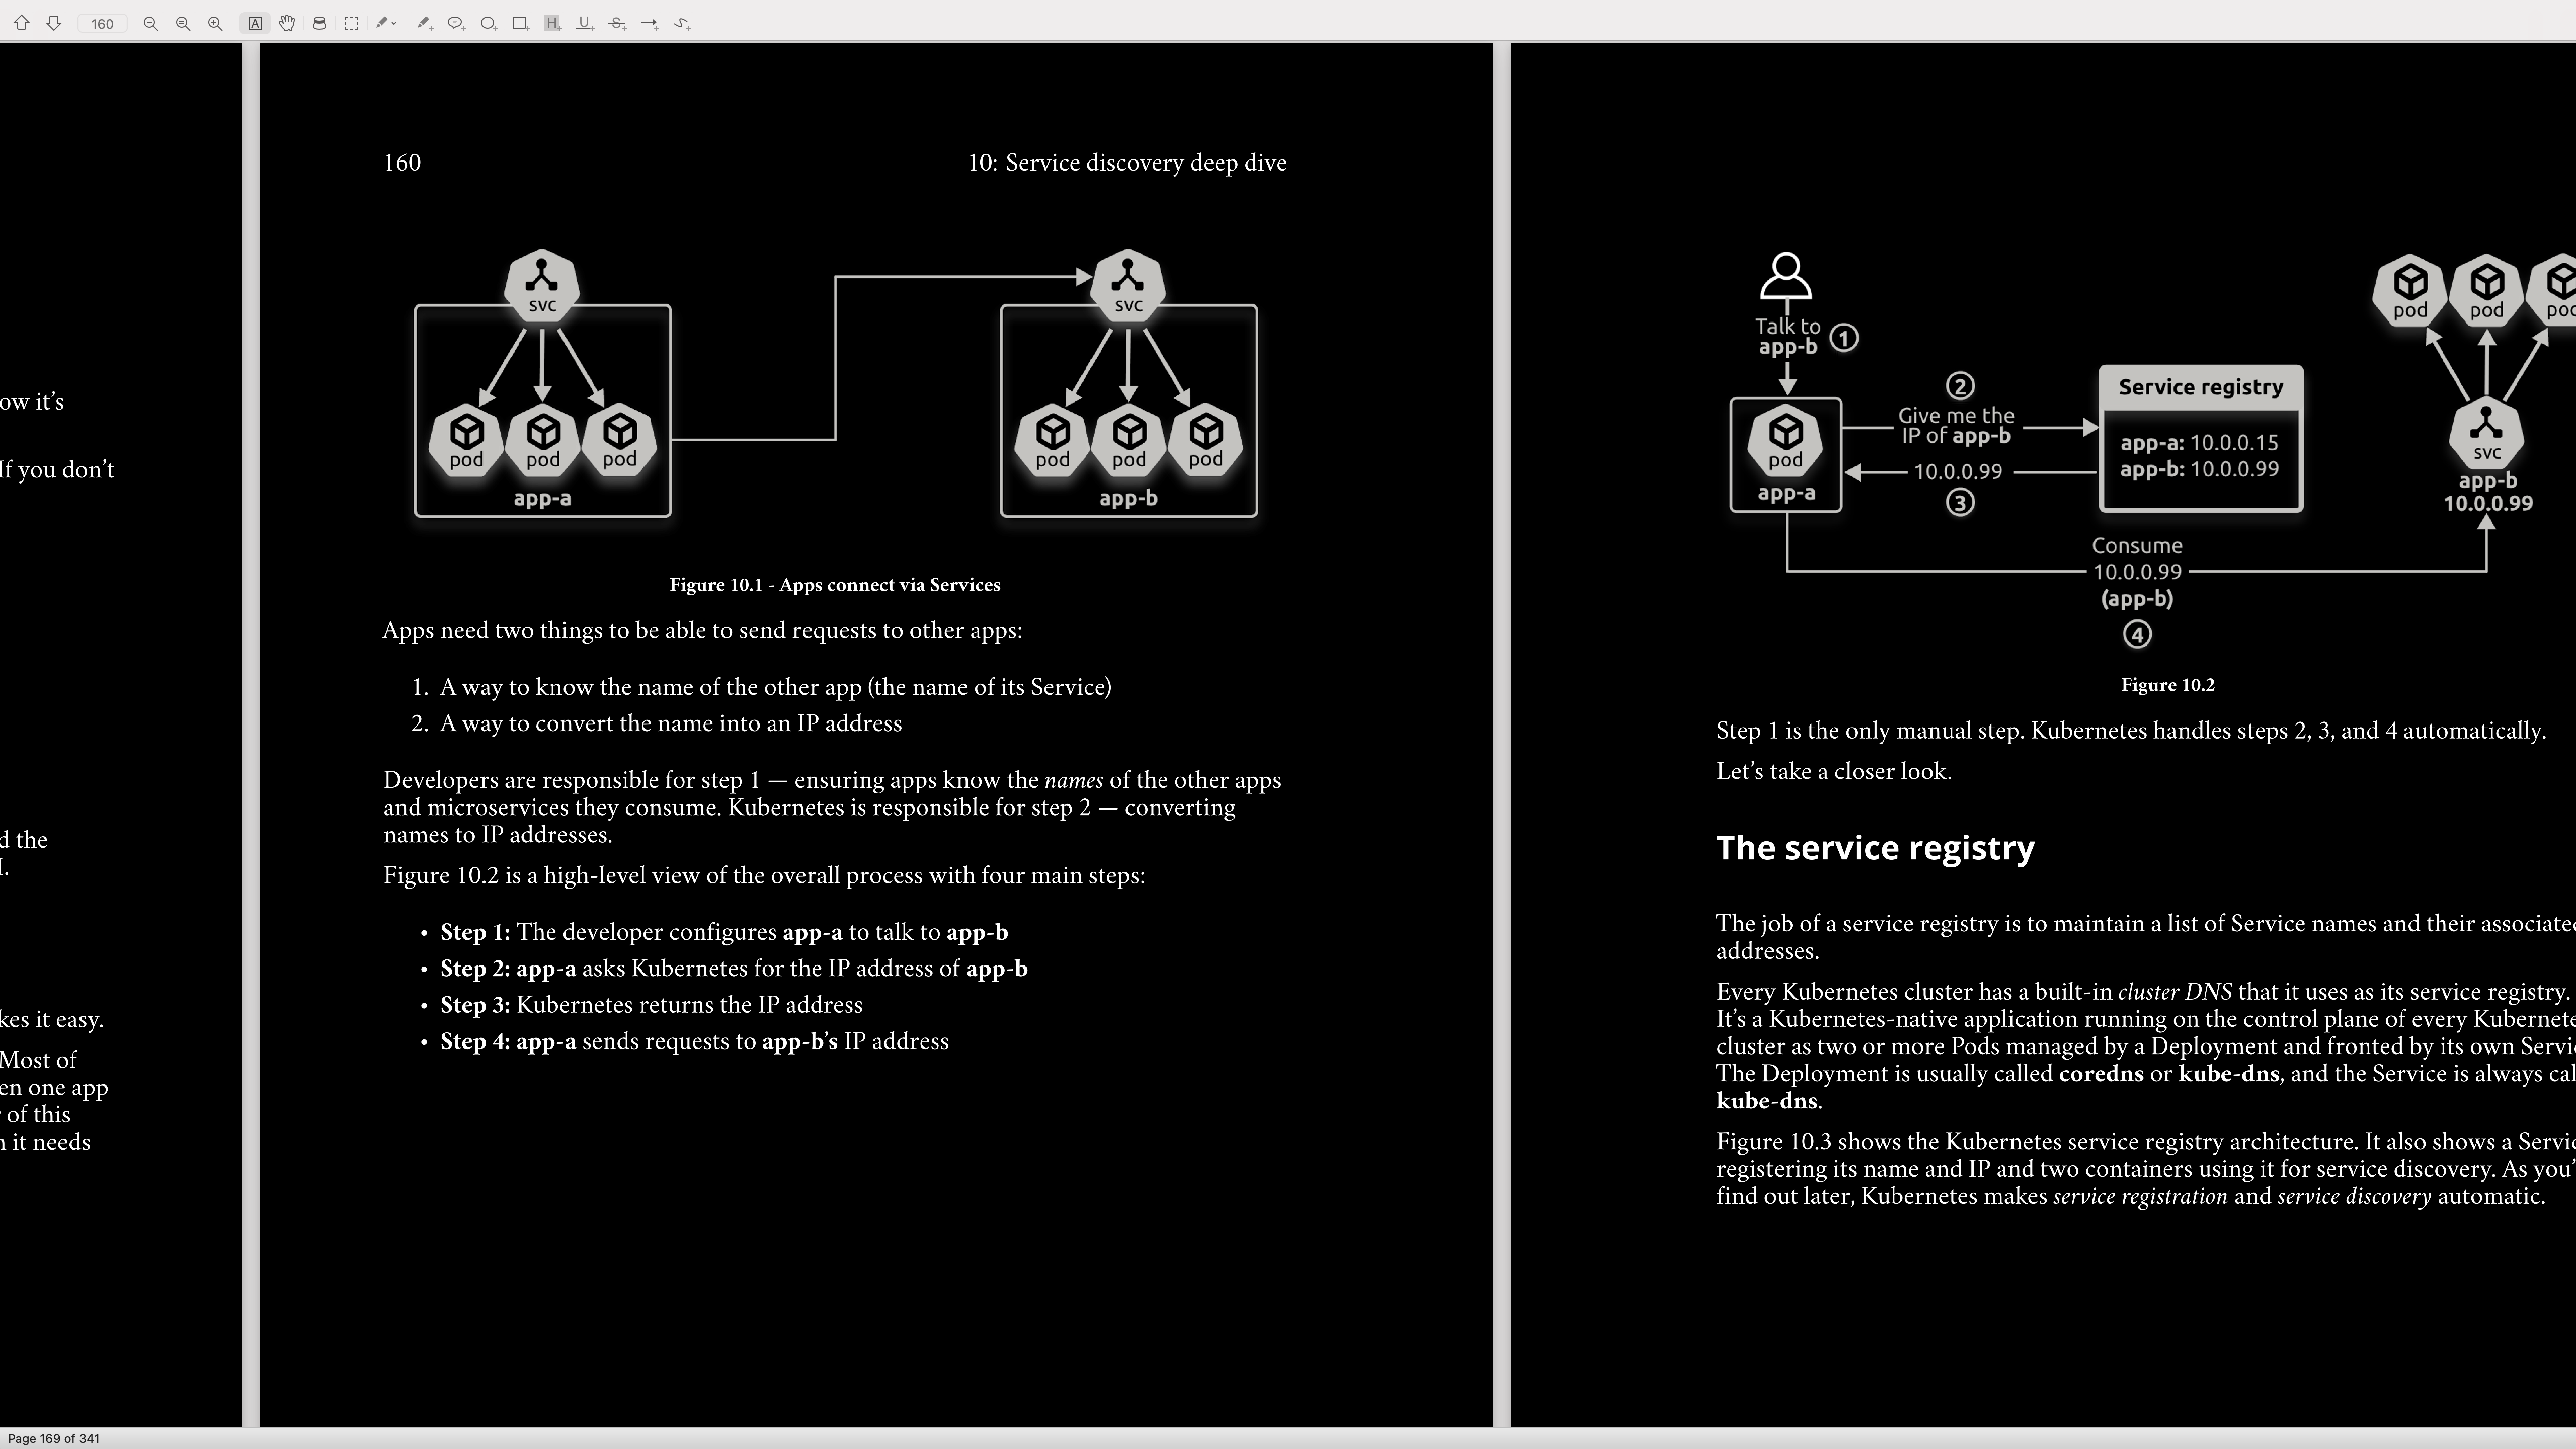
While troubleshooting issue with Docker CLI (macOS) API version compatibility with newer versions of Podman, I have learned that the default Podman machine (a.k.a Podman engine) that I am running is over 16 months old. While updating Podman machine (actually creating new Podman machine) didn’t make the original problem go away, I learned something new through this process, which I want to document here, because it seems not too many Podman users are aware of this (yet! and it’s 2026).
Ok, so first I deleted “default podman machine” and I was ready to create new one in Podman Desktop UI. Settings > Resources > Create new …
But then I noticed this warning:
There is an problem finding ‘krunkit’ binary. Try to install it manualy, or install Podman from installer.
So quick googling about what this means and I learn that (starting versions 5.2.x of Podman) besides Apple Hypervisor (applehv), which relies on Virtualization.framework, they now allow to use alternative provider (meaning, virtualization provider) for macOS. That alternative provider relies on customizations on top of Hypervisor.framework, which is lower level API (than Virtualization.framework) from Apple.
“AppleHV” (short for Apple Hypervisor) refers to the native virtualization framework built into macOS, allowing software to run virtual machines (VMs) and containers directly on Apple hardware and it is default provider (for Podman engine virtualization) on all platforms other than Apple Sillicon. Some of the things it provides are:
Native Virtualization: It provides a low-level, native way to manage virtualization, often using Apple’s Virtualization.framework.
Podman Usage: AppleHV is commonly used as the backend provider for Podman Machine on macOS (especially with Podman v4.9.1+ and v5.x). It is often used in combination with tools like vfkit to create and run Linux virtual machines.
Performance (Rosetta): On Apple Silicon (M1/M2/M3 chips), AppleHV supports Rosetta 2, allowing for near-native speed when running x86_64 containers on ARM hardware.
Alternatives: It is the modern alternative to QEMU, which was previously the standard, often providing better performance.
While Apple Hypervisor is still great on Apple Sillicon Macs for “cookie cutter” containers that mostly just need CPU, those who want to leverage GPUs on their Mac (e.g. to run LLM models through Docker/Podman) might want to take advantage of this alternative provider.
The alternative provider relies on two important things (also prerequisites to be able to use this provider when creating new Podman machine):
containers/libkrun - a dynamic library that allows programs to easily acquire the ability to run processes in a partially isolated environment using KVM Virtualization on Linux and HVF on macOS/ARM64.
containers/krunkit - is a tool to launch configurable virtual machines using the libkrun platform.
The latter of the two is required in order to be able to run Podman machines with this new alternative provider. The installation was very simple.
1 2
brew tap slp/krunkit brew install krunkit
Restarting Podman Desktop and going to Settings > Resources > Create new… this time didn’t show the warning, which is signal that it properly detected libkrun and krunkit. However, first attempt to create Podman machine wiht “default GPU enabled (LibKrun)“ as a provider, didn’t work out as expected. The machine got frozen in “Currently starting up“ stage forever. I had to force remove it, reboot and re-create podman machine.
After this, I was able to see that machine is running and it is using libkrun for VM provider.
1 2 3 4 5
podman machine list
NAME VM TYPE CREATED LAST UP CPUS MEMORY DISK SIZE podman-machine-gpu* libkrun About an hour ago Currently running 4 7.451GiB 27GiB
So now, I am ready to try out some LLM models loaded via Docker/Podman. This will be exciting, because up till now, I ran most local models via ollama and LM Studio.
It is almost the end of the 2025. I got unlucky with chalazion on both eyes after hitting a gym that I guess isn’t very well maintained and cleaned after all. Ever since, I have been very sensitive with my eyes and trying not to put them through too much pressure. I also started noticing that no matter what kind of light settings I choose on the PocketBook reader app on the Android tablet, after a few hours of use, I start to feel the eye strain.
So to cope, I started searching for tools that would:
Allow me to invert PDF books into black background with white text, while keeping images untouched (not inverted). This is in order to have better experience while reading on both tablet and Mac.
Replace not so flexible reader layouts on macOS Preview (default app for PDFs on macOS) and allow me to use more screen when reading on large monitors (27” up to 34”)
Ideally - they are FOSS
I was not very positive at first that such tools will exist in FOSS for macOS, but I was quite wrong. After some digging and crawling through some blog posts, I decided to give these two a try:
Skim - a PDF reader and note-taker for OS X (macOS)
Stirling PDF - actively developed open-source web-based PDF editor that cares about privacy and security
It is great! Very lightweight, installable through Homebrew and best of all, it has this “Horizontal Continuous” reader mode that I couldn’t be happier with. Depending on the book, it allows me to load up to 3 full pages of the book in the horizontal plane with enough zoom to not get eye strain on 27” monitor. The best part is the ease of scrolling horizontally which for me at least makes it harder to forget about the context when moving pages. For most books however, 2 pages loaded in this reading mode are the most comfortable setup. Image below shows an example.
And the best of all is that this Horizontal Continuous reading mode can be used in full screen (image below).
Stirling helps you read and edit PDFs privately. For “home users”, or people who need to edit PDFs only every few weeks, it offers Free tier, with self-hosted web-app. It also offers binary bundles in the form of desktop application for all platforms (macOS, Linux and Windows), but those seem to be outdated and considered legacy in terms of features. It seems that development team is giving highest priority to the web-app at the moment.
I chose to start with “Server Deployments” option but on macOS, using Docker. I simply followed “Docker Guide” and I was up and running in few minutes. Here is a snapshot of the main page UI.
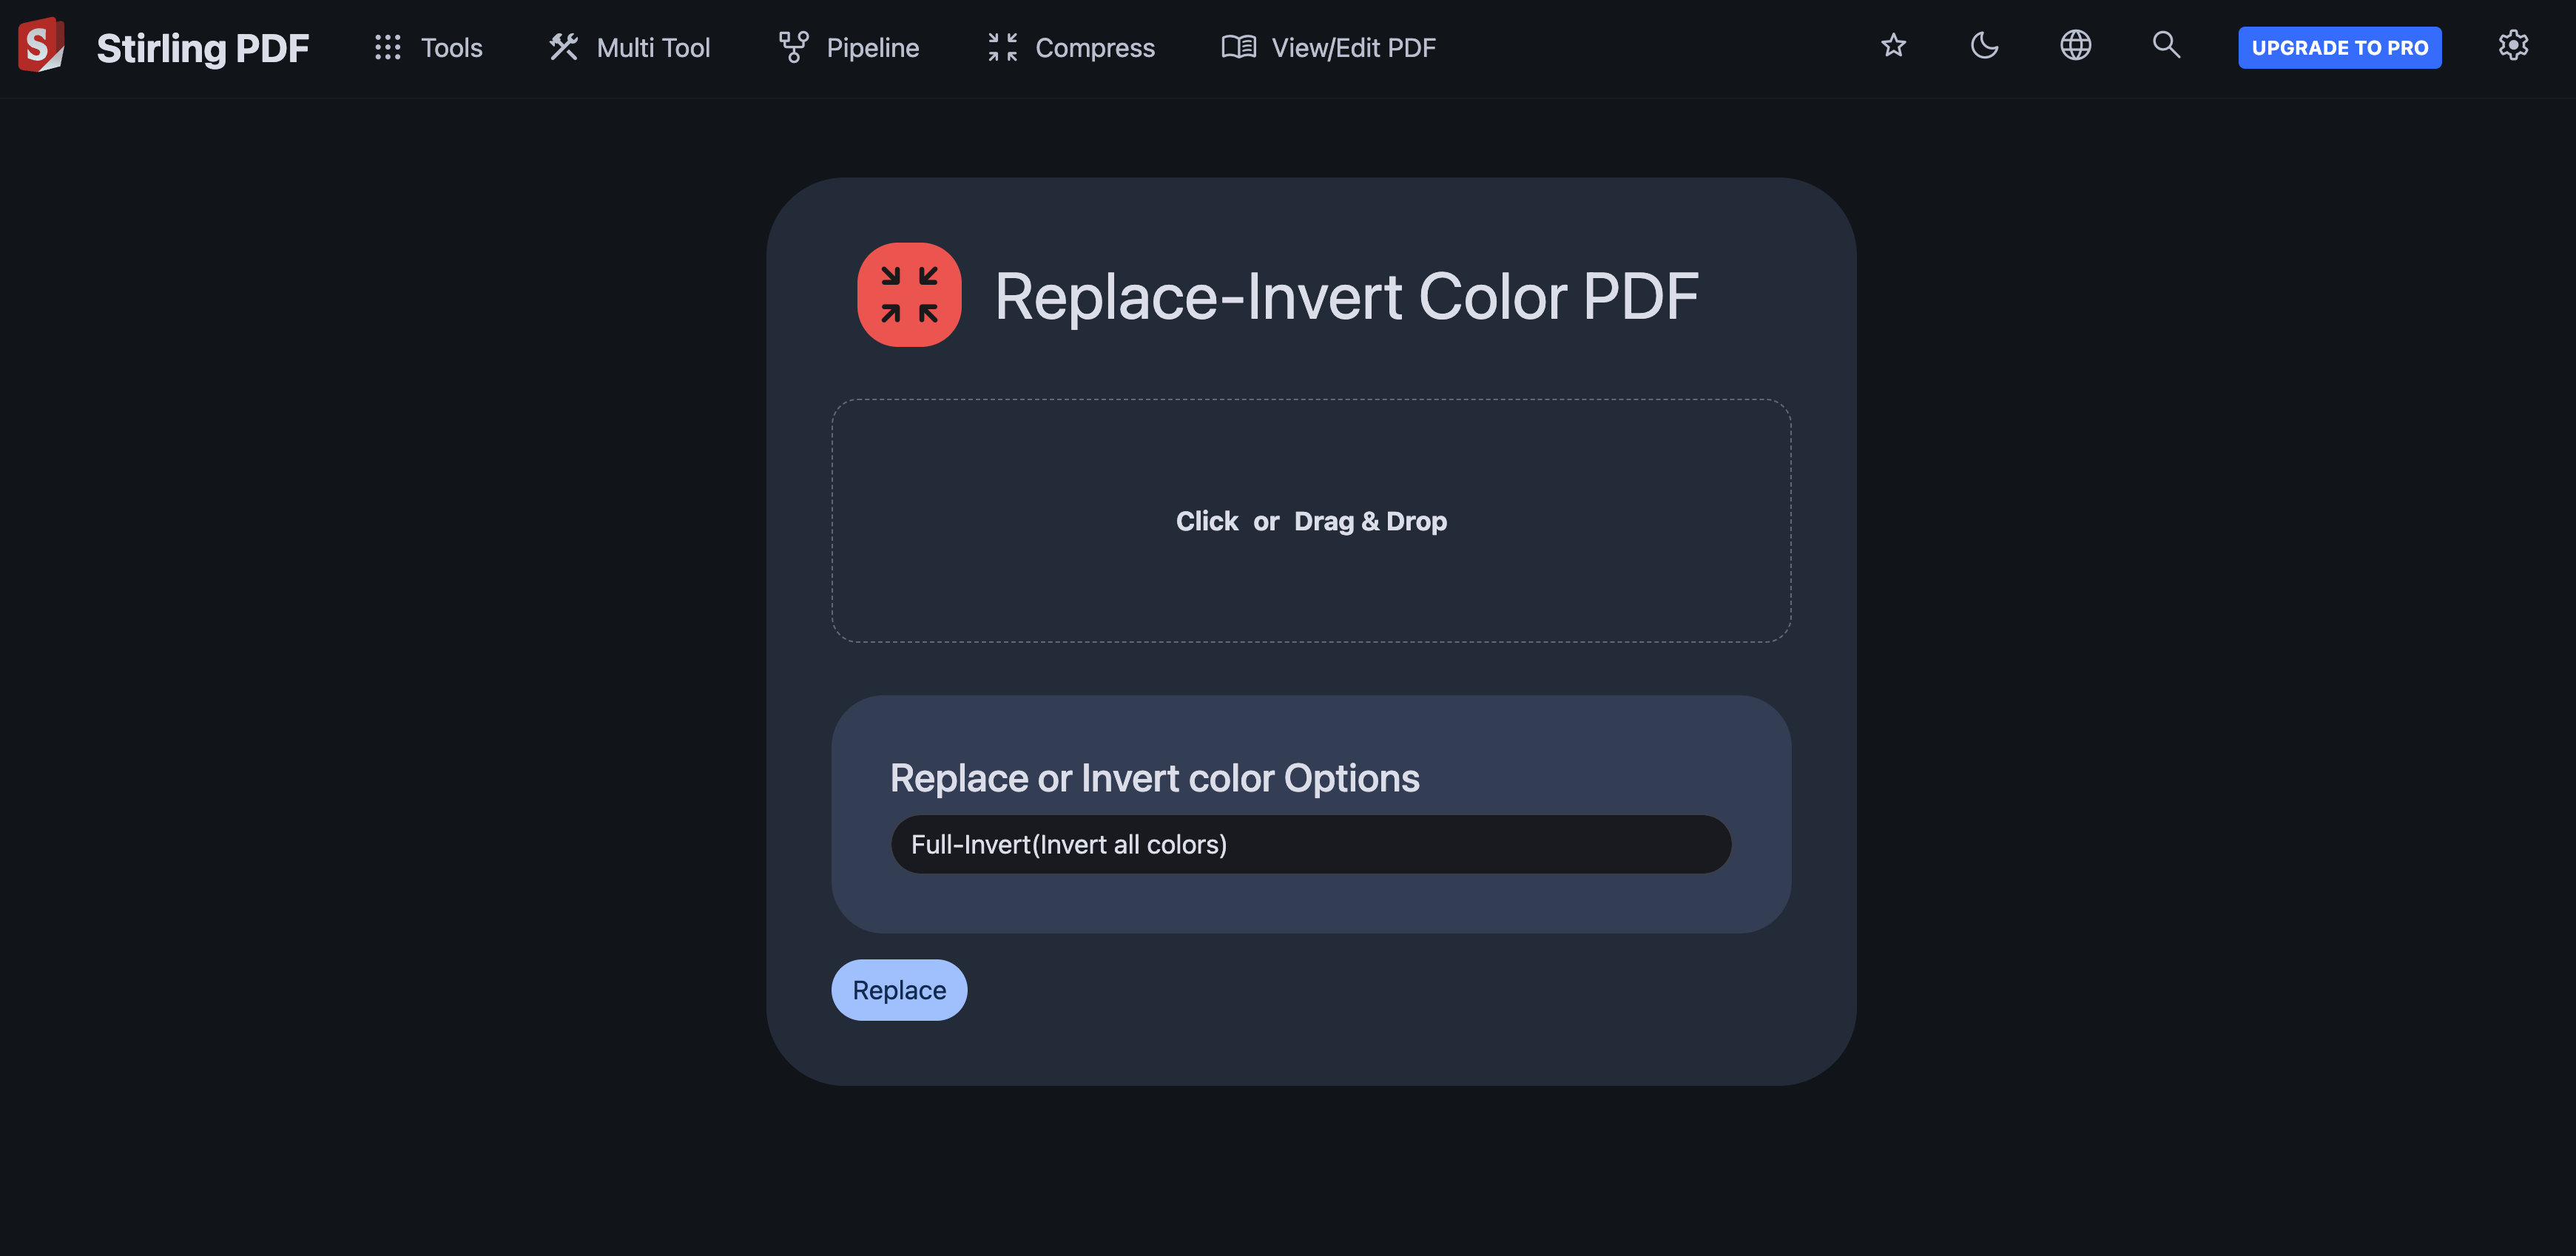
Of course, the first tool that I tried to invert the color of few books was “Replace-Invert Color PDF”, and I couldn’t be happier.
The size of those inverted PDFs isn’t small to be honest, but given that I read at most 2-3 books at any point in time, all of my devices can handle it.
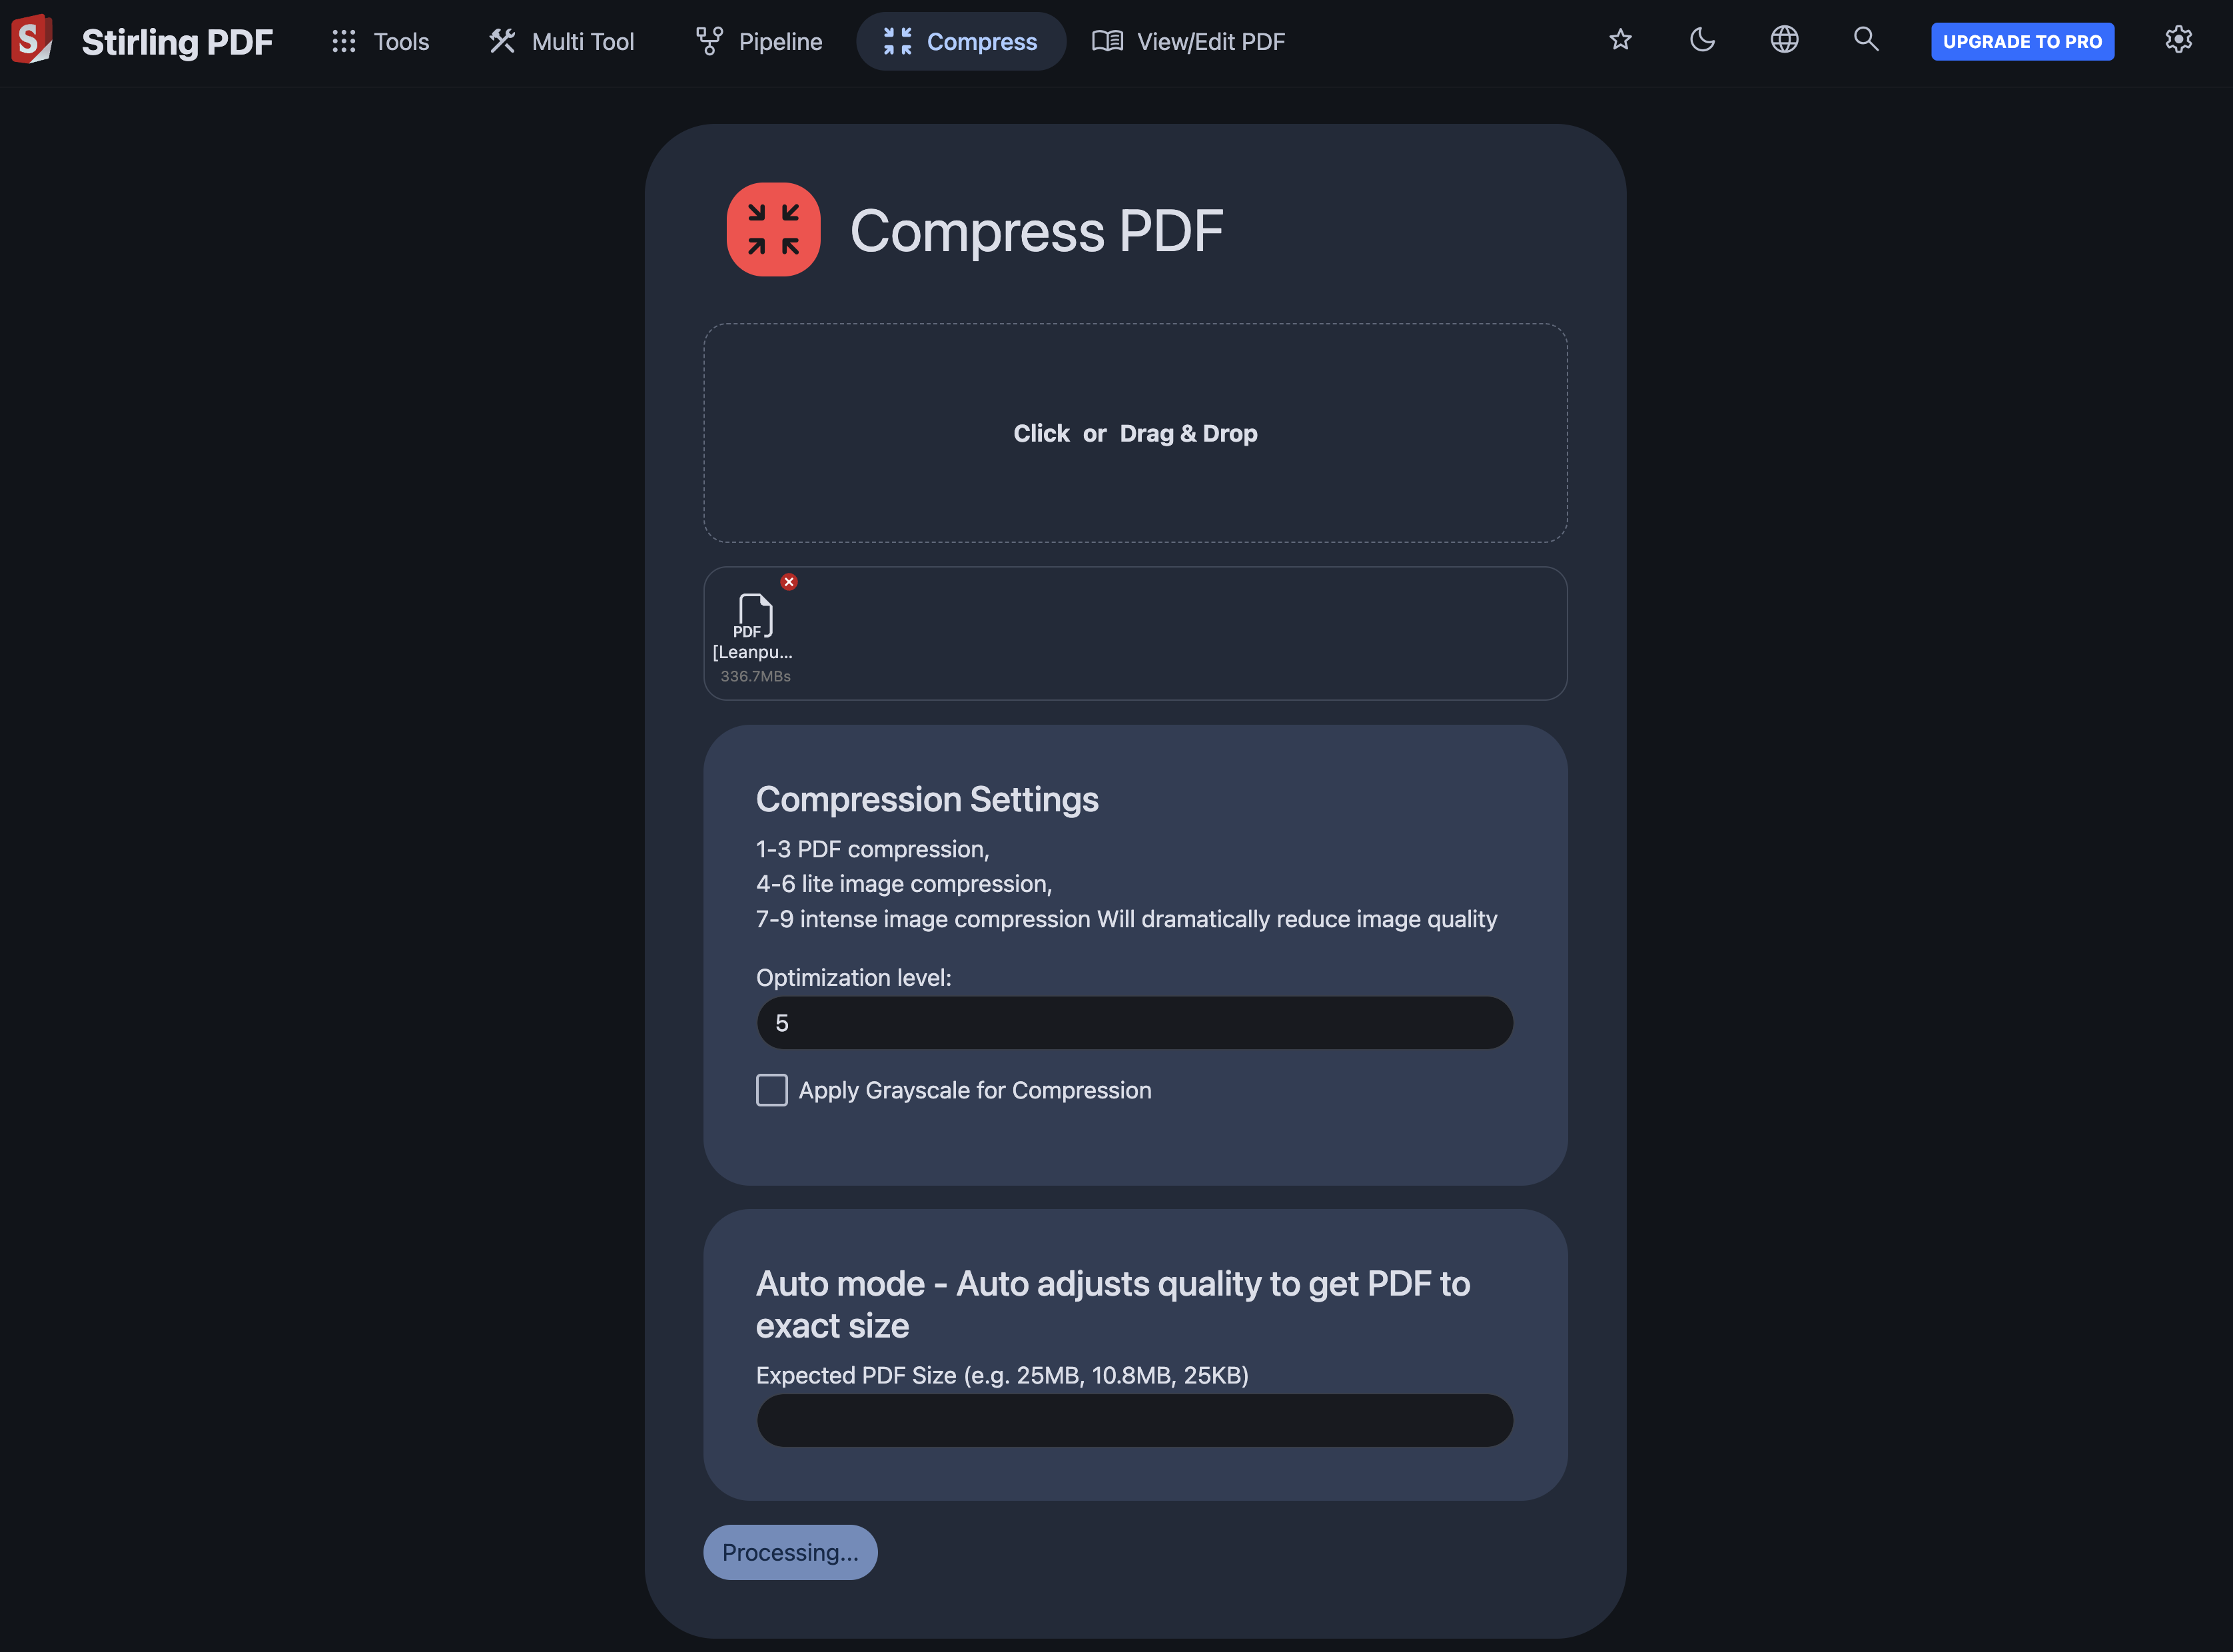
However, even for the problem of size of PDFs, Stirling-PDF offers another great little tool in it’s toolbelt - “Compress PDF”.
All in all, I think I have found a good alternative to Adobe Acrobat PRO that offers plethora of tools with safety and privacy not being neglected.
Another day, another post. And this is one I am super excited to write about. As I have mentioned in the previous post, I have originally followed drduh/YubiKey-Guide (and numerous other guides) for general guidance on how to make YubiKey play nicely with other tools in my workflow. The two aspects of configuration that are not very intuitive and more challenging are definitely the setup of SSH and GitHub commits signing. I primarily say this because it took me significant amount of effort to get the gpg-agent configured right.
So to make it clear, in this post I would like to focus on the following:
Using YubiKey for automatically signing GitHub commits (GPG)
Using YubiKey-resident SSH keys and presence verification for remote GitHub operations (think git push)
✎Using YubiKey for automatically signing GitHub commits
Before we go into any details on what needs to be configured for two to play nicely, a little intro. Git is cryptographically secure, but it’s not foolproof. If you’re taking work from others on the internet and want to verify that commits are actually from a trusted source, Git has a few ways to sign and verify work using GPG. First of all, if you want to sign anything you need to get GPG configured and your personal key installed. In the context of this post, you ideally want that to be done with YubiKey and your GPG keys transfered on YubiKey (at least those with [S] capability).
Before we continue, one more important thing. Signing tags and commits is great, but if you decide to use verification of commit signatures in merge strategy in a daily developer’s workflow, you’ll have to make sure that everyone on your team understands how to do so. If you don’t , you can end up spending a lot of time helping people figure out how to rewrite their commits with signed versions.
So what is really needed to get commits signed and view them as verified in GitHub? For my case, I started by looking at my GPG keys on YubiKey.
The key that will be responsible for signing is subkey rsa4096/C7C4CE019E24528B. However, to make sure GitHub knows about it, I first had to export my public key and let GitHub know about it. Exporting public key can be done with these two simple commands:
which for me created ASCII file gpg-0xF2036890CCE43A6E-2021-05-11.asc in the working directory. Once that is done, all I had to do is upload it to GitHub. To do that go to:
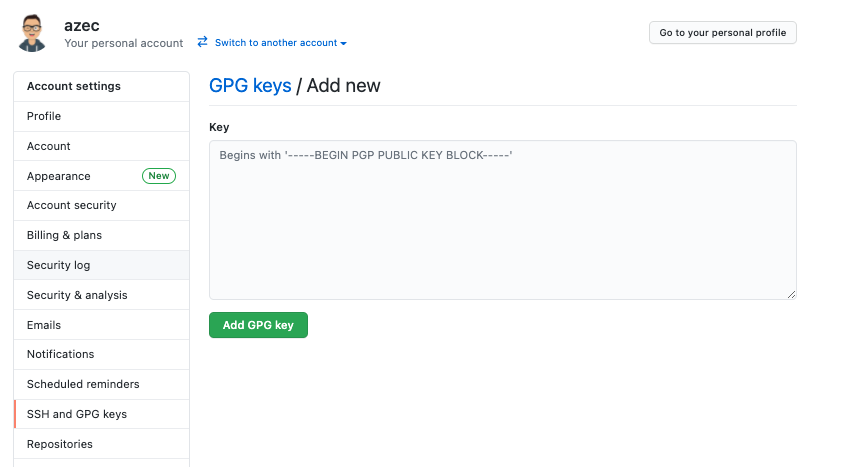
User Profile (icon on the top right) –> Settings –> SSH and GPG keys (menu on the left) –> GPG keys
and click on New GPG key (this is not the most intuitive name for actual import). You will be prompted with text box where you can enter your GPG public key, as on the image below.
Once that is confirmed, you will see that GitHub lists your GPG key in the main section, together with details about identities attached to the key, all of its subkeys and key ID. One important thing to note is that GitHub will not show your commits as verified and green, unless the e-mail address configured for signing GPG key in git config is also a verified e-mail address you are using on GitHub. Instead, in the commit log, GitHub will show yellow bubble notification that says “Unverified” - indicating that commits are signed, but that e-mail address is not trusted by GitHub as owned by the same user. To read more about this - you can follow a GitHub guide Using a verified email address in your GPG key.
When it comes to my GPG key and identities on it, I already had a few e-mail identities on the key that I also added and previously verified on GitHub. For others I mostly don’t care.
Once this is done, it is time to instruct your git CLI on how to behave in terms of signing commits (and tags) and do some configuration.
First you need to tell git which GPG key to use for signing, if you want to sign anything. Since I already had $KEYID holding my key, I accomplished that with:
1
$ git config --global user.signingkey $KEYID
At this point you should be able to sign commits going forward by just passing -S flag to the git command, e.g.
1
$ git commit -a -S -m 'Signed commit'
However if you want to GPG sign all your commits, you have to add the -S option all the time. The commit.gpgsign config option allows to sign all commits automatically. So I configured that as well
1
$ git config --global commit.gpgsign true
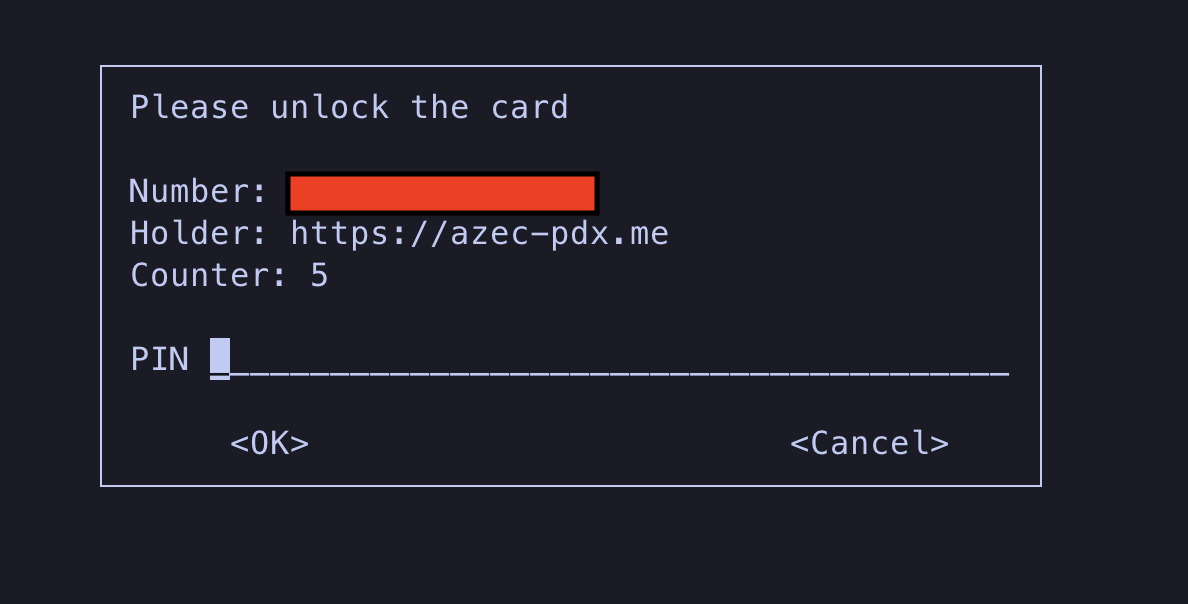
Finally, it was time to test this. I made a simple commit. At this point, YubiKey prompts you for a smart-card PIN as on the image below.
Enter the pin and your commit should be good to be pushed. However if you get back response such as:
1
2
error: gpg failed to sign the data fatal: failed to write commit object
it may mean that your YubiKey is not properly inserted and recognized as smart-card by gpg. You can fix that by verifying your YubiKey is recognized:
1
$ gpg --card-status
If things are good, you should get large output with details about your YubiKey (which I will not share here). But if you get something like below
1
gpg: OpenPGP card not available: Unsupported operation
it means your YubiKey is not ready (or not properly inserted). You need to re-insert it to USB-C port as many times as needed until above command provides you with the details of your smart-card.
Another problem for not being able to sign commit could be that you didn’t import the key. If your YubiKey is showing ok, then you can do that with:
1 2 3
$ gpg --recv $KEYID gpg: key 0xF2036890CCE43A6E: no user ID gpg: Total number processed: 1
If at any point in this step (trying to make signed commit) you also get an error message saying “Inappropriate ioctl for device” (like I did), I would like to point you to this StackOverflow thread as a great resource that helped me out. Basically to resolve it, in my ~/.zshrc file I had to add:
1
export GPG_TTY=$(tty)
What this does is it makes the name of the terminal attached to standard input available to gpg program in your active shell. For me that is zsh.
At this point, everything was ok. After retrying commit and entering PIN once again, it went fine. And finally, after visiting commit log in GitHub, I could confirm that my commits are now signed and with GPG identity that matches one of my verified GitHub e-mail addresses.
So far so good. Now, it is the time to talk about SSH keys used for GitHub.
✎Using YubiKey-resident SSH keys and presence verification for remote GitHub operations
The goal of this section is to share my 1-day fresh experience of using new SSH keys for GitHub managed by YubiKey. While it has long been possible to use the YubiKey for SSH via the OpenPGP or PIV feature, the direct support in SSH is easier to set up, more portable, and works with any U2F or FIDO2 security key – even older ones like the FIDO U2F Security Key by Yubico.
Well, before I drill into the details about how to configure resident SSH keys with passwordless MFA and use them for GitHub remote operations (think git push), I would just like to mention that my excitement is huge because this is a new feature announced by GitHub and YubiKey on May 10th 2021 (see resources at the bottom of the post for these exciting posts).
In SSH, two algorithms are used: a key exchange algorithm (Diffie-Hellman or the elliptic-curve variant called ECDH) and a signature algorithm. The key exchange yields the secret key which will be used to encrypt data for that session. The signature is so that the client can make sure that it talks to the right server (another signature, computed by the client, may be used if the server enforces key-based client authentication). Even when ECDH is used for the key exchange, most SSH servers and clients will use DSA or RSA keys for the signatures. If you want a signature algorithm based on elliptic curves, then that’s ECDSA or Ed25519. *And those are the types of SSH keys that GitHub just added support. * So going forward, for my case, I will focus on generating Ed25519 based SSH keys using YubiKey.
So let’s dive in. Before we can do anything here, it is important to have openssh and libfido2 installed. On Mac, both can be installed with brew. For other UNIX-oid OS-es the libfido2 GitHub page provides installation instructions. It is also important for openssh to be at v8.2 or later.
1 2 3 4 5 6 7
$ brew install openssh libfido2 Warning: openssh 8.6p1 is already installed and up-to-date. To reinstall 8.6p1, run: brew reinstall openssh Warning: libfido2 1.7.0 is already installed and up-to-date. To reinstall 1.7.0, run: brew reinstall libfido2
Since I have already done this, I just get the warnings for both, showing current versions (which I am happy with).
Another prerequisite for this is to ensure that FIDO/U2F interface is enabled on YubiKey. This can be done with using ykman (another tool available via brew for YubiKey configuration).
1 2 3 4 5 6 7 8 9 10 11 12 13 14
$ ykman info Device type: YubiKey 5Ci Serial number: <REDACTED> Firmware version: 5.2.7 Form factor: Keychain (USB-C, Lightning) Enabled USB interfaces: OTP, FIDO, CCID
$ ssh-keygen -vvv -t ed25519-sk -O resident -O verify-required -C azec.pdx@pm.me Generating public/private ed25519-sk key pair. You may need to touch your authenticator to authorize key generation. Enter PIN for authenticator: debug3: start_helper: started pid=2878 debug3: ssh_msg_send: type 5 debug3: ssh_msg_recv entering debug1: start_helper: starting /usr/local/Cellar/openssh/8.6p1/libexec/ssh-sk-helper debug1: sshsk_enroll: provider "internal", device "(null)", application "ssh:", userid "(null)", flags 0x25, challenge len 0 with-pin debug1: sshsk_enroll: using random challenge debug1: sk_probe: 1 device(s) detected debug1: sk_probe: selecting sk by touch debug1: ssh_sk_enroll: using device IOService:/AppleACPIPlatformExpert/PCI0@0/AppleACPIPCI/XHC1@14/XHC1@14000000/HS03@14300000/YubiKey OTP+FIDO+CCID@14300000/IOUSBHostInterface@1/AppleUserUSBHostHIDDevice debug1: ssh_sk_enroll: fido_dev_make_cred: FIDO_ERR_PIN_NOT_SET debug1: sshsk_enroll: provider "internal" failure -1 debug1: ssh-sk-helper: Enrollment failed: invalid format debug1: main: reply len 8 debug3: ssh_msg_send: type 5 debug1: client_converse: helper returned error -4 debug3: reap_helper: pid=2878 Key enrollment failed: invalid format
NOTE 1:-O resident option ensures generated SSH key is resident to security key (YubiKey) - it is easier to import it to a new computer because it can be loaded directly from the security key. NOTE 2:-O verify-required option ensures that security key will be configured to require a PIN or other user authentication whenever you use this SSH key.
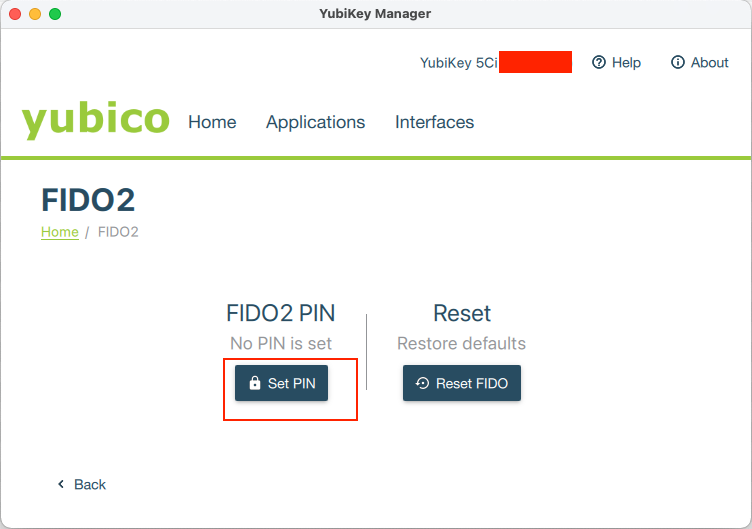
As you can see, this failed for me first time. Thanks to the verbose logging, I was able to see that the problem with this is that I have never actually tinkered with FIDO2 feature of YubiKey and therefore I left the FIDO2 PIN unset. So I had to change that. And the simplest way to do this is to re-insert YubiKey and pull out YubiKey Manager app, then go to Applications –> FIDO2 and finally Set PIN, as indicated on the image below.
After that was done, my second attempt was successful:
$ ssh-keygen -t ed25519-sk -O resident -O verify-required -C azec.pdx@pm.me Generating public/private ed25519-sk key pair. You may need to touch your authenticator to authorize key generation. Enter PIN for authenticator: <-- !!! ENTER FIDO2 PIN HERE debug3: start_helper: started pid=18785 debug1: start_helper: starting /usr/local/Cellar/openssh/8.6p1/libexec/ssh-sk-helper debug3: ssh_msg_send: type 5 debug3: ssh_msg_recv entering debug1: sshsk_enroll: provider "internal", device "(null)", application "ssh:", userid "(null)", flags 0x25, challenge len 0 with-pin debug1: sshsk_enroll: using random challenge debug1: sk_probe: 1 device(s) detected debug1: sk_probe: selecting sk by touch debug1: ssh_sk_enroll: using device IOService:/AppleACPIPlatformExpert/PCI0@0/AppleACPIPCI/XHC1@14/XHC1@14000000/HS03@14300000/YubiKey OTP+FIDO+CCID@14300000/IOUSBHostInterface@1/AppleUserUSBHostHIDDevice debug1: ssh_sk_enroll: attestation cert len=706 debug1: ssh_sk_enroll: authdata len=129 debug1: main: reply len 1058 debug3: ssh_msg_send: type 5 debug3: reap_helper: pid=18785 Enter file inwhich to save the key (/Users/amer/.ssh/id_ed25519_sk): azec-pdx-github Enter passphrase (empty for no passphrase): Enter same passphrase again: Your identification has been saved in azec-pdx-github Your public key has been saved in azec-pdx-github.pub The key fingerprint is: SHA256:J20G1tWmQAro4fkYDQ7WMPu15QLuww5gu4Y3dABdCmg azec.pdx@pm.me The key's randomart image is: +[ED25519-SK 256]-+ |o.o+... .. .. | |oE++= . o.. o | |.oo=.=. = .. o | | .o*o.= o . | |.. .o+o S = | |..ooo .. = | |.o..+ | |..+o . | |.o .. | +----[SHA256]-----+
NOTE: The line Enter PIN for authenticator: is asking for your FIDO2 pin (set in previous step). After you enter it correctly, the prompt will hang on the next line and not do anyhing until you tap on the YubiKey sensor. This is in order to verify user’s presence while generating the key as well as to provide some entropy for the key generation. It doesn’t say so anywhere in the guides, and I barely noticed blinking green led light on the device as it was too close to another one of my USB cables.
Note that the above sequence for generating SSH key will actually persist public and private keys to your ~/.ssh directory under name you specify.
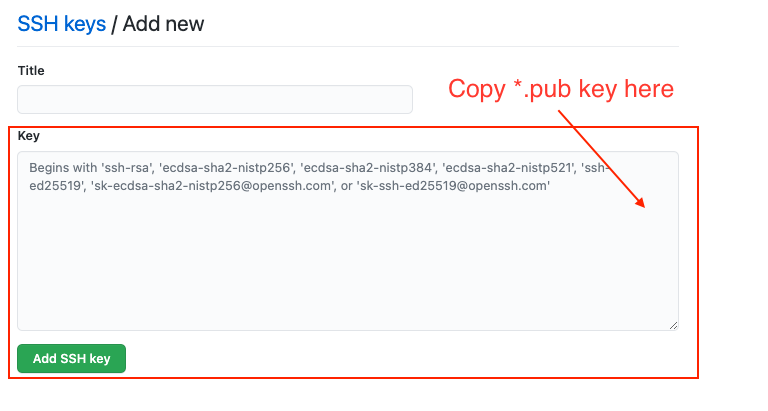
In order to be able to use this SSH key with GitHub, we need to import it to GitHub by going to User Profile (upper right corner) –> Settings –> SSH and GPG keys –> New SSH key, or simply clicking on keys if you are already logged in to GitHub. Then copy your key to clipboard
1
pbcopy < ~/.ssh/azec-pdx-github.pub
and stash it to the Key field below.
Make sure you give it a nice title if you are managing multiple keys. GitHub may ask you to re-enter your password at this step, despite being logged in. Once that is done, we can verify that key is listed under new name on SSH and GPG keys page.
Now that we have added keys to the GitHub, it is time to do some local ssh configuration. One of the nuances is that with openssh being required, it doesn’t play very well with Mac keychain for remembering SSH key passphrases. So if you had previous config under ~/.ssh/config , you may need to change a thing or two. In my case I had to add this line to the top of config:
1 2 3
Host * IgnoreUnknown UseKeychain
Additionally for my github.com host configuration, I had to comment line about UseKeychain, like shown below.
Once that is done, it was time to test YubiKey behavior and use of new SSH key with git push. Out of curiosity, I unplugged YubiKey to see what will the failure look like. And here it is.
1 2 3 4 5 6 7 8 9 10 11
<my_git_repo> $ git push Enter passphrase for key '/Users/amer/.ssh/azec-pdx-github': Enter PIN for ED25519-SK key /Users/amer/.ssh/azec-pdx-github: Confirm user presence for key ED25519-SK SHA256:J20G1tWmQAro4fkYDQ7WMPu15QLuww5gu4Y3dABdCmg sign_and_send_pubkey: signing failed for ED25519-SK "/Users/amer/.ssh/azec-pdx-github": invalid format git@github.com: Permission denied (publickey). fatal: Could not read from remote repository.
Please make sure you have the correct access rights and the repository exists.
While the error sign_and_send_pubkey: signing failed for ED25519-SK “/Users/amer/.ssh/azec-pdx-github”: invalid format is indicative that things didn’t go well, it is also little misleading. The real problem here is that despite entering correct SSH key passphrase and entering correct FIDO2 PIN, there is no security key present on the USB interface. Since the user presence verification (by doing “tap” on security key as we will see later in successful attempt) comes after passphrase and PIN entry steps, the whole step of SSH signing fails, which git finally presents us with:
1 2
git@github.com: Permission denied (publickey). fatal: Could not read from remote repository.
Now, finally the last step. It was time to try the actual push with security key present. So I inserted my YubiKey and verified that FIDO2 interface is visible to the system with below command.
Then I tried git push once again with outcome in the next snippet.
1 2 3 4 5 6 7 8 9 10 11 12
Enter passphrase for key '/Users/amer/.ssh/azec-pdx-github': Enter PIN for ED25519-SK key /Users/amer/.ssh/azec-pdx-github: Confirm user presence for key ED25519-SK SHA256:J20G1tWmQAro4fkYDQ7WMPu15QLuww5gu4Y3dABdCmg User presence confirmed Enumerating objects: 5, done. Counting objects: 100% (5/5), done. Delta compression using up to 16 threads Compressing objects: 100% (2/2), done. Writing objects: 100% (3/3), 999 bytes | 999.00 KiB/s, done. Total 3 (delta 0), reused 0 (delta 0), pack-reused 0 To github.com:<REDACTED>/<REDACTED>.git 8e59217..d75ce8d feature/<REDACTED> -> feature/<REDACTED>
Voila! All good! After entering SSH key passphrase, FIDO2 PIN and finally confirming my presence by doing “tap” on the security key, the push was success! My commit was now on the git remote.
It has been a good few months since I started playing with and using YubiKey 5ci. So far I haven’t really used it for anything more serious, at least not until I learn enough about its capabilities, as well as how to use it together with gpg suite.
YubiKey 5Ci truly is the first of its kind. Of all the features you can read about on the product page I would just mention these:
It is also worth mentioning that it has good support from password managers. Basically, you can use it as 2nd factor authentication device in two ways:
By using it as virtual MFA device. For this to work you need the device plugged into one of your mobile/desktop (physical) devices and Yubico Authenticator app/client for one of the supported OSes.
By using it as FIDO U2F device. For those that are new to this, here is what it means:
U2F is an open authentication standard that enables internet users to securely access any number of online services with one single security key instantly and with no drivers or client software needed.
You can read more about this feature on the product page. Basically the device comes equipped with two pins (one on each side) that you need to press when prompted for 2nd factor key from services that support this standard. On the press of those keys, device generates series of keystrokes that are verified by service provider, in similar fashion how OTP tokens are generated in the 1st option above.
It may have caught your attention but if it did not - this device also can behave as a Smart Card and offers Open PGP functionality. What this means is that you can use it to manage your GPG keys in multiple ways. And that is exactly what I want to focus on in this post, with emphasis on my use-cases:
Using GPG keys managed by YubiKey with Keybase
Using GPG keys managed by YubiKey with ProtonMail
IDEALLY - Using just single GPG key managed by YubiKey for both Keybase and ProtonMail
First and probably most important thing to know (which you could guess, I didn’t know when I started experimenting) is that with posession of security key (YubiKey), users have two strategies how to manage GPG keys:
Generating Keys externally from the YubiKey
Generating Your PGP Key directly on Your YubiKey
Both of the above methods have pros and cons:
Pros:
1st method provides opportunity to backup GPG keys elsewhere
2nd method (generating the PGP on the YubiKey) ensures that malware can never steal your PGP private key
Cons:
1st method - it is strongly recommended that you to generate keys on an offline system
2nd method - it means that the key can not be backed up so if your YubiKey is lost or damaged the PGP key is irrecoverable
However, of the two methods above, the first one is strongly recommended (by YubiKey) because 1st method provides opportunity of “safely” backup GPG keys (in sume durable form - either paper or other electronic form), at least according to the official article Using Your YubiKey with OpenPGP. You can find more details about proceedure for generating GPG keys for both strategies on that page.
As far as my keys are concerned, I have followed another (by now very famous guide) at drduh/YubiKey-Guide.
The process is pretty straightforward and eventually I ended up with 1 master key and 3 subkeys (one for signing, one for encryption and one for authentication):
Keybase comes with variety of options for PGP in its CLI subcommand keybase pgp [OPTIONS]. The ones most relevant for our topic here are:
1 2 3 4
select Select a key from GnuPG as your own and register the public half with Keybase import Import a PGP key into keybase drop Drop Keybase's use of a PGP key list List the active PGP keys in your account.
If you had any previously generated (and/or managed by Keybase) GPG keys, I recommend that you use drop option to drop them. This was certainly my case, as I was only interested in adding to the Keybase my public GPG key, specifically the one managed by YubiKey, so that other users on this network can use it to encrypt messages to me via Keybase Chat.
Now to the hard part. There are two very similar but somewhat confusing ways to add your GPG key to Keybase. Using select or using import subcommand listed above. In this step, it really depends what you want to do. As I said earlier, my interest WAS NOT to have Keybase keyring managing any secret/private part of my GPG keys. So I had to read carefully what each of these subcommands does. And for posterity, here is the the gist of each:
The import subcommand
1 2 3 4 5 6 7 8 9 10 11 12 13 14 15 16 17 18 19
USAGE: keybase pgp import [command options]
DESCRIPTION: "keybase pgp import" imports a PGP secret key for use with Keybase. It accepts that secret key via file (with the "--infile" flag) or otherwise via standard input. The secret key is used to sign the public PGP key into the user's Keybase sigchain. The secret key is also imported into the local Keybase keyring and encrypted with the local key security protocol.
If (and only if) the "--push-secret" flag is specified, this command pushes the PGP secret key to the Keybase server, encrypted with the user's passphrase. The server, in this case, could theoretically recover the PGP secret key by cracking the user's passphrase.
OPTIONS: -i, --infile Specify an infile (stdin by default). --push-secret Push an encrypted copy of the secret key to the server.
As I have already stated twice, my case was not to import secret key to local Keybase keyring and neither was it to push secret key to Keybase server. So I completely skipped this subcommand.
DESCRIPTION: "keybase pgp select" looks at the local GnuPG keychain for all available secret keys. It then makes those keys available for use with keybase. The steps involved are: (1a) sign a signature chain link with the selected PGP key and the existing device key; (1b) push this signature and the public PGP key to the server; and if "--import" flag is passed: (2a) copy the PGP secret half into your local Keybase keyring; and (2b) encrypt this secret key with Keybase's local key security mechanism.
By default, Keybase suggests only one PGP public key, but if you want to, you can supply the "--multi" flag to override this restriction. If you want your secret key imported into the local Keybase keyring, then use the "--import" flag. Importing your secret key to Keybase keyring makes it possible to use Keybase PGP commands like "pgp decrypt" or "pgp sign".
If you don't want to publish signature chain link to Keybase servers, use "--no-publish" flag. It's only valid when both "--no-publish" and "--import" flags are used.
This operation will never push your secret key, encrypted or otherwise, to the Keybase server.
OPTIONS: --multi Allow multiple PGP keys. --import Import private key to the local Keybase keyring. --no-publish Only import to Keybase keyring, do not publish on user profile.
As described, this command provides a way of selecting multiple GPG keys from local GPG keyring and then making them available for use with Keybase. So basically, this is all I needed (minus all the fancy stuff).
So to finalize this section, I have done following to make my public GPG key available to Keybase:
1 2 3 4 5 6 7 8 9 10 11 12 13 14 15 16 17 18
> keybase pgp select --multi
You are selecting a PGP key from your local GnuPG keychain, and will publish a statement signed with this key to make it part of your Keybase.io identity.
Note that GnuPG will prompt you to perform this signature.
You can also import the secret key to *local*, *encrypted* Keybase keyring, enabling decryption and signing with the Keybase client. To do that, use "--import" flag.
After selecting the only option available (1) my key showed up as verified and published on Keybase 0xF2036890CCE43A6E. Notice that I did not pass --import flag to the above command, as I am not interested in the Keybase CLI features such as keybase pgp decrypt and keybase pgp sign.
Next, I wanted to explore how can I use this same GPG key with ProtonMail.
✎Using GPG keys (managed by YubiKey) with ProtonMail
Now, in the interest of saving you time - I will state it upfront, this is actually not possible. If you are interested in knowing more about why, read on.
So one thing about ProtonMail is that their UI provides users with opportunity to generate new PGP keys. This is all well described in their How to use PGP article. And for quite some time, I have had separate keys that vere completely managed by ProtonMail. By managed, I mean, that keys were generated on ProtonMail and never ever exported elsewhere to any external system. While ProtonMail allows exporting both public and private GPG keys generated by their UI, I never had interest in doing so.
Also, I didn’t have a need to generate ProtonMail GPG keys externally and import them (another ProtonMail feature), until now. I was on the happy path following these steps:
I have analyzed keys (by importing them to local GPG keyring) that were managed by ProtonMail to see what capabilities they have. I noted that they generate 1 subkey which has both [SC] capabilities. I also noted that this is not the case with any of my subkeys generated with YubiKey and started wondering if this will be causing any issues when I try to import YubiKey-managed keys.
I completely deleted my GPG keys managed by ProtonMail from their UI attached to one of my e-mail identities of interest. I also deleted them from the local GPG keyring.
(please do this with caution), I have obtained my YubiKeys backup, and tried to import subkeys private key + public key to ProtonMail. Everything was smooth until it prompted me for private key passphrase. However with 100% certainty that I am entering correct passphrase, it kept re-prompting me endlessly to enter it again. At this point I knew there is something wrong and decided to stop here.
After being blocked on step 3. I have decided to reach out to ProtonMail support and describe my case. Here is the gist of my ask and their follow-up.
me:
Timestamp: 1620182869

Hi there,

I am trying to consolidate my GPG subkeys managed with YubiKey and my GPG keys imported in ProtonMail. Originally I was generating private/public key from within ProtonMail - one for each of my ProtonMail identities and when I export them and import them to my GPG ring they show following:

pub rsa4096 2019-03-14 [SC]
766B78E832154AD500656D3B289A688B26C7CA3A
uid [ unknown] amer.zec@pm.me <amer.zec@pm.me>
sub rsa4096 2019-03-14 [E]

pub rsa4096 2021-04-25 [SC]
9C2BEC2FB2A1289237BCDA0349AA76F7ECE2D91A
uid [ unknown] azec.pdx@pm.me <azec.pdx@pm.me>
sub rsa4096 2021-04-25 [E]

However, since I started using YubiKey I have this setup:
1 master key with C capability
1 subkey with S capability
1 subkey with E capability
1 subkey with A capability

and all my ProtonMail and other e-mail identities are added to the master key.

So I am curious if there is a way for me to discard above keys that originated by ProtonMail and import some combination of subkeys that I manage with YubiKey? If so, would the capabilities of my existing keys be sufficient, or I would have to create additional subkeys just for ProtonMail use?

Thanks!
ProtonMail support:
Hello,

Thank you for contacting ProtonMail support.

Unfortunately, importing subkeys without the master key is not supported. In the GPG documentation, you can see that "this is a GNU extension to OpenPGP and other implementations cannot be expected to successfully import such a key."
https://www.gnupg.org/documentation/manpage.html

Our documentation on using PGP can be found in this article:
https://protonmail.com/support/knowledge-base/how-to-use-pgp/

Feel free to get back to us with any additional questions or concerns. Our team remains available if needed.
Kind regards,
Ivana

Customer Support
ProtonMail
So while the quick follow up kicked in with joy once I saw the e-mail, it was pretty disappointing to learn that ProtonMail doesn’t support importing subkeys. And for me, importing my master secret key (after moving it to YubiKey secure card) was not an option.
As an alternative, I have decided to use separate ProtonMail managed pair of GPG keys, as listed below (links lead to public key hosted on my website):
So that is all for now. In the next post, I will try to focus on:
Using GPG keys on YubiKey for signing git commits (and making sure they are verified on GitHub)
Using GPG keys on YubiKey for generating secure SSH keys for GitHub authentication, with private key material never leaving YubiKey (not being on your local machine). This is relatively new feature as of May 10th 2021 and I have been already using it for a day and I am very excited to write about it.
I hope you enjoyed the read and please stop by soon!
It is no secret that a Cape Horn Loop is a very popular hiking destination among Washingtonians and Oregonians. And it may have become even more popular since the beginning of COVID-19 pandemic.
We like it. However, it is not our top weekend hike on the Washington side of the Columbia river. I couldn’t really say we are very frequent visitors here. We try to come here for a quick hike, only if we are not in the mood to drive further east on the State Route 14. There are couple other hikes that we visit more frequently on this route and I will try to blog about it some other time (I promise!).
One thing that we absolutely love about Cape Horn Loop though is getting to the platform with wild horses. Basically, there is a family owned farm about 3.2km (~2mi) up from the trailhead. For several years this used to be our standard end of the trail. Up to the horses, enjoy seeing them and then hike back down for a total of 6.6km (~4.1mi). Horses farm is at about 379m elevation and it is marked as GATE on the Cape Horn Trail (#4418) vicinity map (provided by the Forest Service tail website). If you head up there, please have in mind that feeding and petting horses is not allowed (think of the impact of each visitor trying to do that).
However, two weekends ago, I have decided to do something completely different. My father in-law mentioned the idea of exploring other side of the loop - which you may have already guessed, continues beyond horses. And not just hiking it, but actually trying to run it in order to hit all other remaining viewpoints. It didn’t took long to convince me and to bite to the idea.
So I decided to try it. And in the rest of this post, I would like to focus on what was new and exciting part for me - beyond horses. I guess I will start with first surprise. I was always under the impression that the other side of the loop is somehow more visited because it is could also be tied to the State Route 14. But as soon as I started running from horses platform and after a little bit of gravel road, I started noticing that I may be alone for the most part. It was mostly uncrowded (especially if I compare it to number of people and cars parked at the trailhead only a weekend before). And what about things that you can see if you decide to go beyond horses, you may ask? Well, there are total of 4 viewpoints, and according to the map above, 3/4 are more known and come in this order as you are droping the elevation on the trail:
I have added pictures from each to the gallery of this post. There is one more viewpoint, but it is significantly smaller and very steep and it comes after the Nancy Russell Overlook. I assume it is not much advertized as it doesn’t allow for more than 5 people to make a break and observe the view at the same time.
At some point I hit the sign showing that going further is prohibited. Later I learned that this is also the farthest point you can hike during peregrine falcon nesting season (February 1st to July 15th). At that point my watch was already showing ~6km and I still had to go back. But I really liked the Windblown Fir Viewpoint and decided to take a good break there. It was really enjoyable sitting on the grass with small winds and looking down on the Columbia River. Another thing that made this break great was Lemongrass+Cherry+Matcha Livbar. I had one that we picked up at the Portland Marathon 2019 opening at Oregon Convention Center, when my friend Irfan Šljivo came up from California to run PDX Marathon. I have no idea how this bar didn’t get eaten since then, but it was amazing and I absolutely will need to order more.
So after the great break on that viewpoint, it was time to go back up to horses and then come down to the trailhead - returning 6km. I was already quite tired and had only less then a half jug of water container, so I had to be more rational about hydration while returning. I made another breathing break when I reached horses again, less than 5 minutes probably. It took me 1h sharp to come back to treailhead after resting at Windblown Fir Viewpoint, for the total of ~12km.
Some other stats of this run are below:
Distance: 12.00 km
Elapsed Time: 2:45:53
Moving Time: 1:30:39
Time: 1:34:11
Min Elev: 148 m
Max Elev: 398 m
Calories: 1,154 C
For those interested in Garmin trail of this run that you could follow, I have exported route in GPX file activity_6625084157.gpx (click for download).
This is the first post in the series about our vacation in China in the fall of 2018. On the morning of 21st September, we got up and wandered around the street “Ju’er Hutong” and the nearby suburbs of Beijing (Peking). Plan for the day was to visit as much as possible around Tiananmen square.
Tiananmen square is a city square in the centre of Beijing, China, named after the Tiananmen (“Gate of Heavenly Peace”) located to its north, separating it from the Forbidden City.
Since our hotel wasn’t far from public transportation, we caught a local bus (each ticket only 2 CNY/RMB) on “Jiaodaokou S St” which took us all the way to the station between gate to the Forbidden City and other monuments of Tiananmen Square (Chan’ an Ave).
After getting off the bus, we crossed underground tunnel to get to the other side of the Chang’ an Ave with exit next to the National Museum of China. Since I have decided to cover this museum in separate post, I will not go into too many details here. Interesting facts are that the entrance is completely free even for the foreign tourists and we spent 2h only touring one exhibition on the first floor of the west wing. The museum is so large that it could easily take a day to see all the exhibitions.
Our tour naturally followed towards Monument to the People’s Heroes which is central monument of the Tiananmen Square. It is a ten-story obelisk that was erected as a national monument of the People’s Republic of China to the martyrs of revolutionary struggle during the 19th and 20th centuries.
On the west side of this monument we had a chance to see the Great Hall of the People which is used for legislative and ceremonial activities by the government of the People’s Republic of China (PRC) and the ruling Communist Party of China (CPC).
Since we toured the square right before the Mid-Autumn Festival in China, there was already a lot of tourists and locals on the square and it was too busy to go inside of the Mausoleum of Mao Zedong. However we did take a chance to take a pictures in front of it. Mao Zedong (December 26, 1893 – September 9, 1976), commonly known as Chairman Mao, was a Chinese communist revolutionary who became the founding father of the People’s Republic of China, which he ruled as the Chairman of the Communist Party of China from its establishment in 1949 until his death in 1976. Although Mao had wished to be cremated, this was ignored and his body was embalmed. The construction of a mausoleum as his final restplace began shortly after his death. This building is located in the middle of Tiananmen Square but south of the Monument to the People’s Heroes.
Since our goal was to explore the Forbidden City, we moved on in the north direction of the square. Before we crossed big street again, we passed by the large flower basket. These flowers are 17-meter-tall display in the shape of a flower basket at the center of the Tiananmen Square for the celebration of the National Day. It means “Good Luck, China”.
After taking pictures in front of the flower basket, we crossed the street and we found ourselves in front of the large gate that provides entrance to the Forbidden City, which I will cover in another post.