TABLE OF CONTENTS
Another day, another post. And this is one I am super excited to write about.
As I have mentioned in the previous post, I have originally followed drduh/YubiKey-Guide
(and numerous other guides) for general guidance on how to make YubiKey play nicely with other tools in my workflow.
The two aspects of configuration that are not very intuitive and more challenging are definitely the setup of SSH and GitHub commits signing. I primarily say this because it took me significant amount of effort to get the gpg-agent configured right.
So to make it clear, in this post I would like to focus on the following:
- Using YubiKey for automatically signing GitHub commits (GPG)
- Using YubiKey-resident SSH keys and presence verification for remote GitHub operations (think
git push)
✎Using YubiKey for automatically signing GitHub commits
Before we go into any details on what needs to be configured for two to play nicely, a little intro.
Git is cryptographically secure, but it’s not foolproof. If you’re taking work from others on the internet and want to verify that commits are actually from a trusted source, Git has a few ways to sign and verify work using GPG.
First of all, if you want to sign anything you need to get GPG configured and your personal key installed. In the context of this post, you ideally want that to be done with YubiKey and your GPG keys transfered on YubiKey (at least those with [S] capability).
Before we continue, one more important thing. Signing tags and commits is great, but if you decide to use verification of commit signatures in merge strategy in a daily developer’s workflow, you’ll have to make sure that everyone on your team understands how to do so. If you don’t , you can end up spending a lot of time helping people figure out how to rewrite their commits with signed versions.
So what is really needed to get commits signed and view them as verified in GitHub?
For my case, I started by looking at my GPG keys on YubiKey.
1 |
|
The key that will be responsible for signing is subkey rsa4096/C7C4CE019E24528B. However, to make sure GitHub knows about it, I first had to export my public key and let GitHub know about it.
Exporting public key can be done with these two simple commands:
1 | $ export KEYID=0xF2036890CCE43A6E |
which for me created ASCII file gpg-0xF2036890CCE43A6E-2021-05-11.asc in the working directory. Once that is done, all I had to do is upload it to GitHub. To do that go to:
User Profile (icon on the top right) –> Settings –> SSH and GPG keys (menu on the left) –> GPG keys
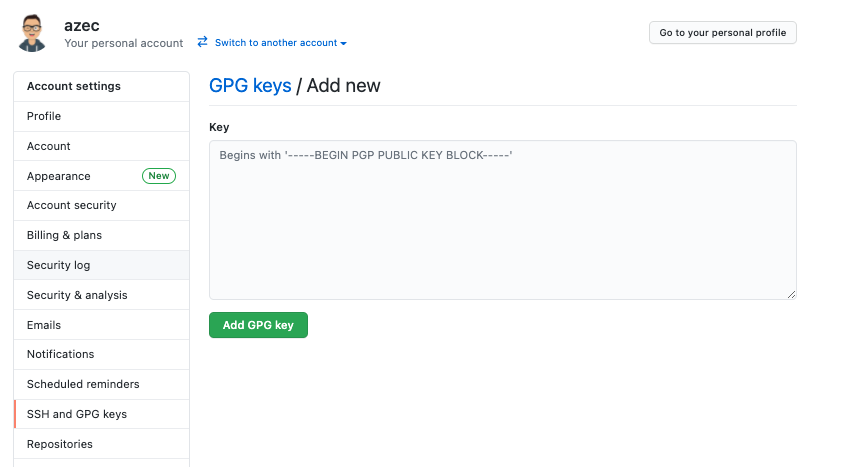
and click on New GPG key (this is not the most intuitive name for actual import).
You will be prompted with text box where you can enter your GPG public key, as on the image below.
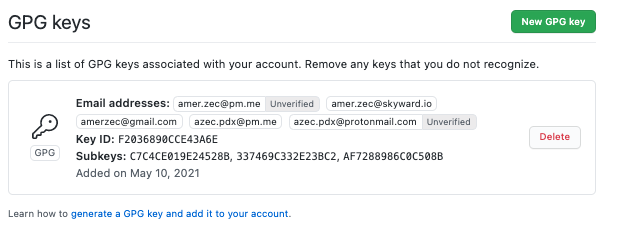
Once that is confirmed, you will see that GitHub lists your GPG key in the main section, together with details about identities attached to the key, all of its subkeys and key ID. One important thing to note is that GitHub will not show your commits as verified and green, unless the e-mail address configured for signing GPG key in git config is also a verified e-mail address you are using on GitHub. Instead, in the commit log, GitHub will show yellow bubble notification that says “Unverified” - indicating that commits are signed, but that e-mail address is not trusted by GitHub as owned by the same user. To read more about this - you can follow a GitHub guide Using a verified email address in your GPG key.
When it comes to my GPG key and identities on it, I already had a few e-mail identities on the key that I also added and previously verified on GitHub. For others I mostly don’t care.
Once this is done, it is time to instruct your git CLI on how to behave in terms of signing commits (and tags) and do some configuration.
First you need to tell git which GPG key to use for signing, if you want to sign anything.
Since I already had $KEYID holding my key, I accomplished that with:
1 | $ git config --global user.signingkey $KEYID |
At this point you should be able to sign commits going forward by just passing -S flag to the git command, e.g.
1 | $ git commit -a -S -m 'Signed commit' |
However if you want to GPG sign all your commits, you have to add the -S option all the time.
The commit.gpgsign config option allows to sign all commits automatically. So I configured that as well
1 | $ git config --global commit.gpgsign true |
Finally, it was time to test this. I made a simple commit. At this point, YubiKey prompts you for a smart-card PIN as on the image below.
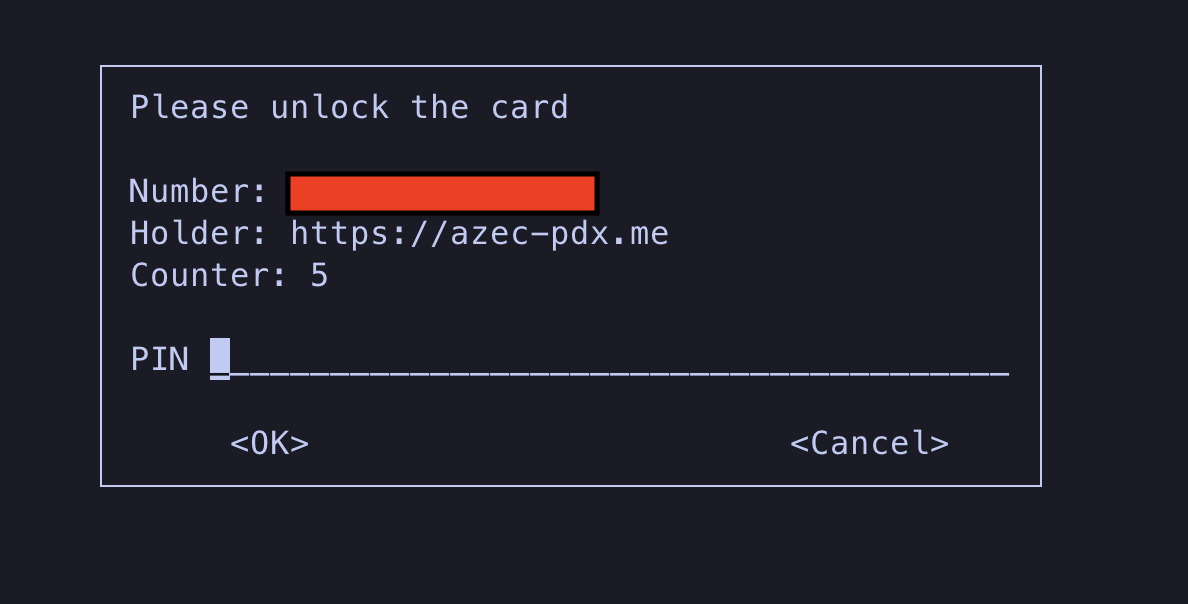
Enter the pin and your commit should be good to be pushed. However if you get back response such as:
1 | error: gpg failed to sign the data |
it may mean that your YubiKey is not properly inserted and recognized as smart-card by gpg.
You can fix that by verifying your YubiKey is recognized:
1 | $ gpg --card-status |
If things are good, you should get large output with details about your YubiKey (which I will not share here). But if you get something like below
1 | gpg: OpenPGP card not available: Unsupported operation |
it means your YubiKey is not ready (or not properly inserted). You need to re-insert it to USB-C port as many times as needed until above command provides you with the details of your smart-card.
Another problem for not being able to sign commit could be that you didn’t import the key. If your YubiKey is showing ok, then you can do that with:
1 | $ gpg --recv $KEYID |
If at any point in this step (trying to make signed commit) you also get an error message saying “Inappropriate ioctl for device” (like I did), I would like to point you to this StackOverflow thread as a great resource that helped me out. Basically to resolve it, in my ~/.zshrc file I had to add:
1 | export GPG_TTY=$(tty) |
What this does is it makes the name of the terminal attached to standard input available to gpg program in your active shell. For me that is zsh.
At this point, everything was ok. After retrying commit and entering PIN once again, it went fine. And finally, after visiting commit log in GitHub, I could confirm that my commits are now signed and with GPG identity that matches one of my verified GitHub e-mail addresses.

So far so good. Now, it is the time to talk about SSH keys used for GitHub.
✎Using YubiKey-resident SSH keys and presence verification for remote GitHub operations
The goal of this section is to share my 1-day fresh experience of using new SSH keys for GitHub managed by YubiKey. While it has long been possible to use the YubiKey for SSH via the OpenPGP or PIV feature, the direct support in SSH is easier to set up, more portable, and works with any U2F or FIDO2 security key – even older ones like the FIDO U2F Security Key by Yubico.
Well, before I drill into the details about how to configure resident SSH keys with passwordless MFA and use them for GitHub remote operations (think git push), I would just like to mention that my excitement is huge because this is a new feature announced by GitHub and YubiKey on May 10th 2021 (see resources at the bottom of the post for these exciting posts).
In SSH, two algorithms are used: a key exchange algorithm (Diffie-Hellman or the elliptic-curve variant called ECDH) and a signature algorithm. The key exchange yields the secret key which will be used to encrypt data for that session. The signature is so that the client can make sure that it talks to the right server (another signature, computed by the client, may be used if the server enforces key-based client authentication). Even when ECDH is used for the key exchange, most SSH servers and clients will use DSA or RSA keys for the signatures. If you want a signature algorithm based on elliptic curves, then that’s ECDSA or Ed25519. *And those are the types of SSH keys that GitHub just added support. * So going forward, for my case, I will focus on generating Ed25519 based SSH keys using YubiKey.
So let’s dive in. Before we can do anything here, it is important to have openssh and libfido2 installed. On Mac, both can be installed with brew. For other UNIX-oid OS-es the libfido2 GitHub page provides installation instructions. It is also important for openssh to be at v8.2 or later.
1 | $ brew install openssh libfido2 |
Since I have already done this, I just get the warnings for both, showing current versions (which I am happy with).
Another prerequisite for this is to ensure that FIDO/U2F interface is enabled on YubiKey. This can be done with using ykman (another tool available via brew for YubiKey configuration).
1 | $ ykman info |
The first thing we have to do is to generate SSH keypair.
1 | $ ssh-keygen -vvv -t ed25519-sk -O resident -O verify-required -C azec.pdx@pm.me |
NOTE 1: -O resident option ensures generated SSH key is resident to security key (YubiKey) - it is easier to import it to a new computer because it can be loaded directly from the security key.
NOTE 2: -O verify-required option ensures that security key will be configured to require a PIN or other user authentication whenever you use this SSH key.
As you can see, this failed for me first time. Thanks to the verbose logging, I was able to see that the problem with this is that I have never actually tinkered with FIDO2 feature of YubiKey and therefore I left the FIDO2 PIN unset. So I had to change that. And the simplest way to do this is to re-insert YubiKey and pull out YubiKey Manager app, then go to Applications –> FIDO2 and finally Set PIN, as indicated on the image below.
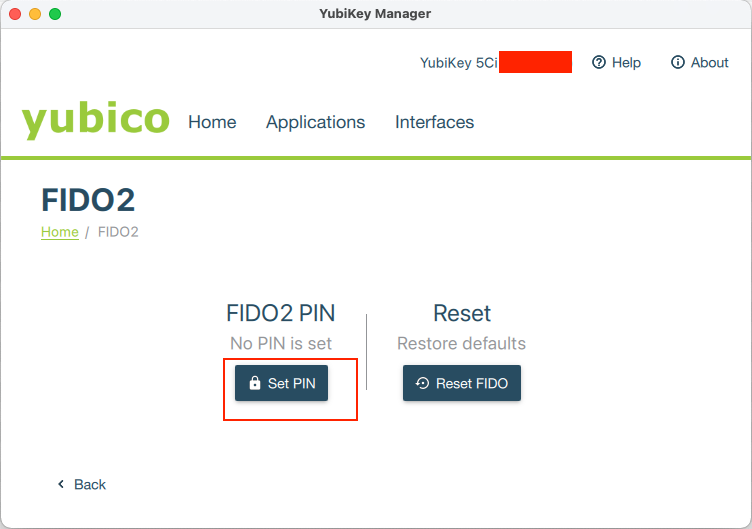
After that was done, my second attempt was successful:
1 | $ ssh-keygen -t ed25519-sk -O resident -O verify-required -C azec.pdx@pm.me |
NOTE: The line Enter PIN for authenticator: is asking for your FIDO2 pin (set in previous step). After you enter it correctly, the prompt will hang on the next line and not do anyhing until you tap on the YubiKey sensor. This is in order to verify user’s presence while generating the key as well as to provide some entropy for the key generation. It doesn’t say so anywhere in the guides, and I barely noticed blinking green led light on the device as it was too close to another one of my USB cables.
Note that the above sequence for generating SSH key will actually persist public and private keys to your ~/.ssh directory under name you specify.
In order to be able to use this SSH key with GitHub, we need to import it to GitHub by going to User Profile (upper right corner) –> Settings –> SSH and GPG keys –> New SSH key, or simply clicking on keys if you are already logged in to GitHub.
Then copy your key to clipboard
1 | pbcopy < ~/.ssh/azec-pdx-github.pub |
and stash it to the Key field below.
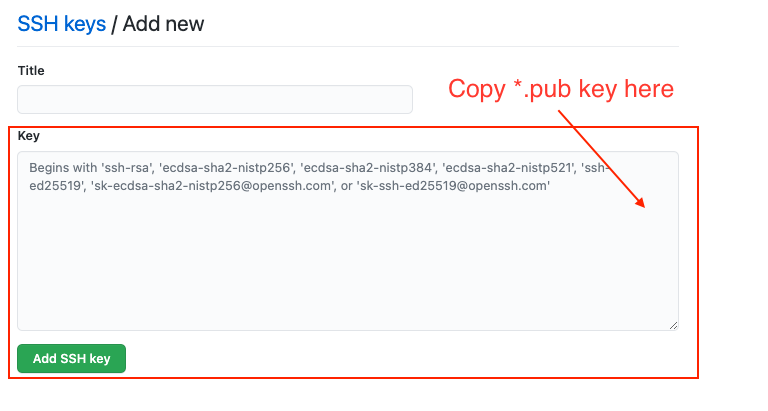
Make sure you give it a nice title if you are managing multiple keys. GitHub may ask you to re-enter your password at this step, despite being logged in. Once that is done, we can verify that key is listed under new name on SSH and GPG keys page.
Now that we have added keys to the GitHub, it is time to do some local ssh configuration.
One of the nuances is that with openssh being required, it doesn’t play very well with Mac keychain for remembering SSH key passphrases. So if you had previous config under ~/.ssh/config , you may need to change a thing or two. In my case I had to add this line to the top of config:
1 |
|
Additionally for my github.com host configuration, I had to comment line about UseKeychain, like shown below.
1 | Host github.com |
Once that is done, it was time to test YubiKey behavior and use of new SSH key with git push.
Out of curiosity, I unplugged YubiKey to see what will the failure look like. And here it is.
1 |
|
While the error sign_and_send_pubkey: signing failed for ED25519-SK “/Users/amer/.ssh/azec-pdx-github”: invalid format is indicative that things didn’t go well, it is also little misleading. The real problem here is that despite entering correct SSH key passphrase and entering correct FIDO2 PIN, there is no security key present on the USB interface. Since the user presence verification (by doing “tap” on security key as we will see later in successful attempt) comes after passphrase and PIN entry steps, the whole step of SSH signing fails, which git finally presents us with:
1 | git@github.com: Permission denied (publickey). |
Now, finally the last step. It was time to try the actual push with security key present. So I inserted my YubiKey and verified that FIDO2 interface is visible to the system with below command.
1 | $ FIDO_DEBUG=1 fido2-token -L |
Then I tried git push once again with outcome in the next snippet.
1 | Enter passphrase for key '/Users/amer/.ssh/azec-pdx-github': |
Voila! All good! After entering SSH key passphrase, FIDO2 PIN and finally confirming my presence by doing “tap” on the security key, the push was success! My commit was now on the git remote.
✎Resources
While trying to get this all right, following resources were a great help to me:
- 05-10-2021 - GitHub Blog Post - Security keys are now supported for SSH Git operations
- 05-10-2021 - Yubico Blog Post - GitHub now supports SSH security keys
- ECDSA vs ECDH vs Ed25519 vs Curve25519 - Security StackExchange Discussion
- Git error - gpg failed to sign data - StackOverflow Discussion
- Yubico/libfido2 GitHub Issue 125 - Key enrollment failed: invalid format
Until the next post, keep it safe!


